My car comes with a built-in Bluetooth hands-free but unfortunately it does not support audio streaming. Luckily there is an AUX input available which uses a regular 3,5 mm jack. Perfect opportunity for a DIY project. I built the Bluetooth DAC using Raspberry Pi Zero W and a DAC hat. This post depicts the details of this project.
For the software, I did the first iteration using Raspbian, and it was indeed fairly simple to get the device working. However, I wanted to see if it would be possible to create a small stripped down image just for this purpose. For this, I used Yocto. Both approaches are described below.
If you just want to get things working without the project details, you can skip directly to the end and grab a prebuilt ready-to-flash image with the Bluetooth DAC functionality.
Hardware
For the hardware I decided to use Raspberry Pi Zero W accompanied with pHAT DAC for the audio output. Linux has good support for Bluetooth audio, so the small and affordable Zero W fits this project nicely even though a full-blown Linux might be a bit excessive for this task. Some smaller microcontroller could handle these tasks as well, but would probably require much more implementation effort for the firmware.
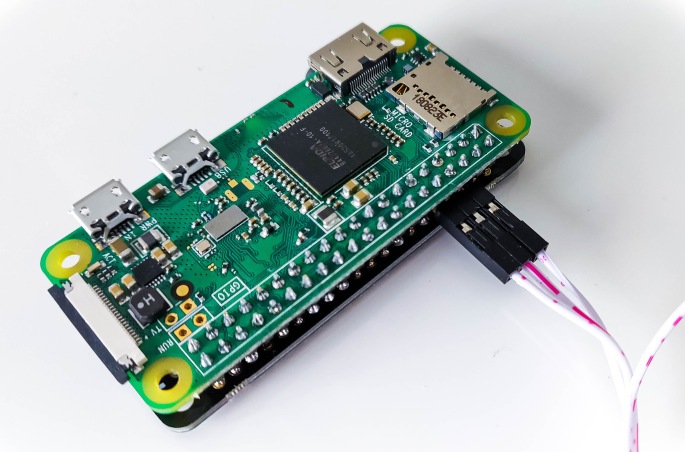
Normally Raspberry Pi hats are mounted on top of the mainboard. However, I decided to mount the DAC hat under the Zero W so the 3,5 mm jack does not stick out so much. Moreover, I soldered the boards directly to each other using a single male header to make a compact package (not going to use this Zero W for anything else anyway). I also added a piece of electrical tape on top of the 3,5 mm jack so the metal parts are isolated from the test pads under the Zero W.

Before the two boards were soldered together, I bent the debug serial port pins 90 degrees and did not solder them to the DAC hat. This way the debug serial was easily accessible and I did not need e.g. a network access to the Pi during development.
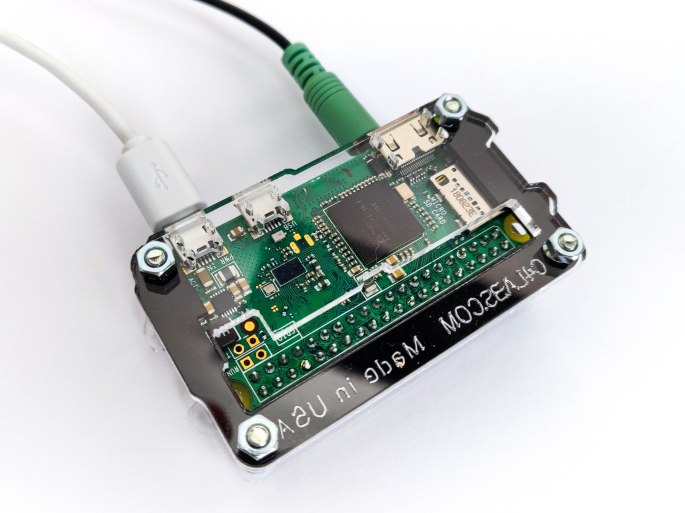
Finally, I added clear acrylic case to finish the hardware.
Using Raspbian
For the first iteration I used Raspbian Buster Lite (https://www.raspberrypi.org/downloads/raspbian/) as the base. I started with the DAC and followed the official tutorial (https://learn.pimoroni.com/tutorial/phat/raspberry-pi-phat-dac-install). When these steps were done, I tested the audio output using aplay utility with headphones connected to the audio output.
For the Bluetooth audio part I found an existing guide that describes how to set up the Advanced Audio Distribution Profile (A2DP) and how to handle automatic pairing. The guide targeted a bit older Rasbian version (Stretch), but it worked more or less directly for Raspbian Buster also. Though, I did have to manually set the bluealsa profile to sink as described in this comment. Otherwise the device was not recognized as audio device.
After going through these guides and with a bit of problem solving the device was working as a Bluetooth DAC. Still, I wanted to see if it would be possible to implement a more lightweight image for this purpose. One that would also be useful for others who are trying to get the Bluetooth DAC functionality working.
Custom image with Yocto
Yocto is a system building tool-set that allows to build customized Linux distributions. Large variety of hardware and devices are supported, including the different Raspberry Pi variants. Raspberry Pi support is implemented in a Board Support Package (BSP) layer, meta-raspberrypi, that extends the generic Yocto layers and provides hardware specific specializations (e.g. bootloaders and kernel configurations). This layer, with its dependencies, allows to build generic Linux images for different Raspberry Pis.
Following the footmarks of the Raspbian specific guide and the DAC guide, I implemented meta-rpi-bt-dac layer that adds the Bluetooth audio functionality and DAC support on top of the generic meta-raspberrypi layer. The project readme provides instructions to build the custom image.
The most important parts of the layer are:
- bluez-alsa_1.4.0.bb recipe that provides build instructions for the Bluetooth ALSA backend
- a2dp-agent which is C implementation for the dbus auto-pairing agent (no need for python dependency as in Raspbian guide)
- rpi-config_git.bbappend which appends the generated config.txt with DAC device tree overlay
- dac-config init script to configure the Bluetooth functionality
The default Yocto configuration for Raspberry Pi uses SysVinit as the init manager. Therefore the systemd service files from the Raspbian guides were converted to init scripts.
The project builds a ready-to-flash Linux image with all the necessary Bluetooth and DAC configurations in place. When the Pi is powered on, it will become discoverable with name “RPi-DAC”. The device accepts all pairings and does not require a pin. The device is recognized as Bluetooth audio device and the audio from the connecting device is streamed to the DAC output.
For this use case only the Bluetooth and audio parts are needed. Therefore the default Yocto image still contains a lot of unnecessary components. I added the following configuration to Yocto local.conf to disable many of the unnecessary features:
MACHINE_FEATURES_remove = "apm wifi screen touchscreen"
DISTRO_FEATURES_remove = "ipv4 ipv6 irda usbgadget usbhost wifi nfs zeroconf 3g nfc x11 wayland vulkan"
Furthermore, I also disabled networking init scripts and removed some unnecessary kernel features to improve the boot time. Measured from dmesg, the start-up time for the device and Bluetooth (excluding the low level bootloader) is about 5 seconds.
...
[    3.962021] Bluetooth: Core ver 2.22
[    3.962246] NET: Registered protocol family 31
[    3.962263] Bluetooth: HCI device and connection manager initialized
[    3.969311] Bluetooth: HCI socket layer initialized
[    3.969361] Bluetooth: L2CAP socket layer initialized
[    3.969384] Bluetooth: SCO socket layer initialized
[    4.748779] Bluetooth: HCI UART driver ver 2.3
[    4.748816] Bluetooth: HCI UART protocol H4 registered
[    4.748828] Bluetooth: HCI UART protocol Three-wire (H5) registered
[    4.751038] Bluetooth: HCI UART protocol Broadcom registered
These optimizations were quite easy and the boot time could certainly be optimized further. Though, I feel that the performance is sufficient for this case and I probably won’t spend much more time optimizing it.
Prebuilt image
The Yocto image with Bluetooth DAC functionality can be build with the instructions in the project README. Though, the full Yocto build can take several hours so a prebuilt image is also provided in the Releases section.
The core-image-base-raspberrypi0-wifi.rootfs.rpi-sdimg file can be flashed directly to a SD card. The image is meant for Raspberry Pi Zero W hardware.

Nicely-done, sir. I never would have guessed the there was a Raspberry-compatible setup for Yocto but in hindsight, of course there would be. You have to love the 5-second boot. 🙂
LikeLiked by 1 person
Thanks! I thought it would be pain to actually use the device if I had to wait tens of seconds for the Bluetooth each time I started the car 😀
LikeLike
Trust me, I’m so going to do this one and I don’t even need the device.
LikeLike
Built it last night in under 5 minutes, and most of that time was attaching the header pin to the PI Zero W. Thanks for taking the time to share!
LikeLiked by 1 person
That’s great to hear! I knew others would find this useful aswell.
LikeLike
Awesome! Exactly what I need on my Goldwing!
LikeLiked by 1 person
This is great, thank you.
Is it possible to change the device name without rebuilding the SD card image?
LikeLike
The name is configured in /etc/bluetooth/main.conf
LikeLike
Thanks – name changed.
But that’s made me aware that it has a filesystem mounted rw, which means that I should do clean shutdowns rather than just disconnect the power? I was hoping to use this in my car…
LikeLike
Good catch. I rebuilt the image with read-only-rootfs flag.
LikeLike
Thanks again. After switching to your rebuilt image I just had to “mount -o remount,rw /”, edit the /etc/bluetooth/main.conf to change the device name then “reboot” to get back to a ro filesystem.
For me, the first attempt to connect a device after booting the Pi seems to fail every time. The second attempt is always fine. The same problem repeats with a second device (without rebooting the Pi first). Do you see the same?
My phone connects to bluetooth for phone calls in my car automatically, but I have to manually connect to the Pi – any idea what causes that difference?
LikeLike
Regarding /var/log/messages entries such as:
Aug 11 09:15:45 raspberrypi0-wifi daemon.err bluetoothd[242]: AVRCP: failed to init uinput for 12:34:56:78:90:AB
I saw this:
https://bugs.launchpad.net/blueman/+bug/439166
and tried this:
modprobe uinput
(via serial console)
and now the logs show then when a device connects:
Aug 11 09:18:23 raspberrypi0-wifi user.info kernel: [ 412.225764] input: 12:34:56:78:90:AB as /devices/virtual/input/input0
I’m not sure what having uinput enables, but it’s one less error message in the logs.
I made it repeatable by putting “uinput” in the file /etc/modules
LikeLike
I haven’t encountered the connection issue you mentioned in previous message (I’ve tested with Android 9). Though I do have to connect each time.
I think the uinput is related to audio/video remote control profile (avrcp) which would allow sending play/pause etc. commands from the Pi.
I’ll apply the fix later this week. Currently pretty busy with work.
LikeLike
OK, thanks. There’s no hurry for me as I’ve applied the changes after booting the image.
I’m finding a few issues with bluetooth behaviour (e.g. connecting and disconnecting multiple devices can cause playback to stop altogether, requiring a restart of bluealsa-aplay (or a reboot, if no terminal connected to the serial console). But these are Bluez problems, not problems with your Pi image build.
Thanks again for your efforts.
LikeLike
Serendipity at its finest! I was looking for a bluetooth-to-headphones adapter for my wife, and then saw this in my Pi blogs! I will build one! Any thoughts on powering this via battery? We have lots of NiMH charger… (No sweat if you this is not in your radar!) Thank you!! -Mike
LikeLike
Done! Added boost converter and 3-AAA NiMH batter holder! Thank you for the original idea! -Mike
LikeLike
Nice one! Glad to hear you found the project useful. At least with my phone the device needs to be paired again on each connect. I already found the issue but did not have time to fix it yet. So you might want to check back for an update.
LikeLike
I’ve been meaning to look into the forgotten-pairing issue too (needs a bit of the filesystem to be in a persistent area?) but haven’t got around to it either. One slight downside – unlike many Bluetooth receivers, this one allows multiple connections, so if someone in a nearby car connects by mistake (or not…), it will pair and be added to the list. It’s not an issue when the list gets reset when the car is turned off. But it is a pain to have to repair every time. Ideally, there’d be a button to accept a new pairing the first time, with a LED to indicate, “Pair new device?”.
LikeLike
/var/lib/bluetooth is on an overlayFS and therefore cleared when the device is powered down. One approach for the pairing that wouldn’t require a button would be to have the device pairable/discoverable only for a while after power up.
LikeLike
I just published a new release on github. The pairing issue is fixed (I created a small separate RW partition for /var/lib so pairing information is not lost) and there is also a simple auto-connect feature. Though the auto-connection is a bit slow at the moment. At least with my phone I had to do a BT scan from the Pi before attempting to connect or it would fail each time.
LikeLike
Awesome, Sami, thanks! I’m not in town at the moment, but will try it when I get home. A “quick” question for you: When I built my battery-powered unit, I did not have to do anything special – it all worked. I did, however, prepare the serial UART pins (bend them for accessibility) as you had suggested, as it seemed wise to provide a debug mechanism. As I have not needed to use such, I did not dig too much, other than to note something about enabling serial to the GPIO would disable bluetooth. Is that true? If I do need to debug the bluetooth connectivity AND have serial connectivity, will that work? (I’ll look up the necessary config…) I figure you’ll know off-hand, as you indicated this is what you did. Thank you! -Mike
LikeLike
Ah! Nevermind with respect to my 2019_Sep_28, 9:14pm post. I found this regarding the serial port: https://www.abelectronics.co.uk/kb/article/1035/raspberry-pi-3–4-and-zero-w-serial-port-usage
LikeLike
The UART is enabled by default in the image so you can simply plug in a TTL serial cable if needed. Though, the boot prints are not printed to UART so you’ll simply get a Linux login when the devices has finished booting up.
LikeLike
Great project, I have my phat DAC and pi W up and running – thanks for the IMG!
I was wondering if you had any thoughts on how to make the Pi and Phone auto pair when they are both switched on?
It’s not a big issue, but it would be nice to not have to accept the pairing each time on my Android 🙂
LikeLike
Sorry I’ve just seen you most recent comment, I’ll watch this space to see if you update to solve the pairing issue.
Thanks again for sharing the project. The 5s load time was what sold it for me 😀
LikeLike
Will this method work with Pi 3B as well or do I need to find some different code? Thanks in advance.
Conor
LikeLike
The approach used would probably also work with Pi 3 but the codes would definitely need adaptation . So the readymade image does not work directly.
LikeLike
Thanks for sharing this project! I used the image to set up a Pi Zero W with a Pimoroni pHAT DAC and it worked flawlessly on first boot. My beautiful 80s Yamaha hi fi amp is now a Bluetooth receiver and the sound quality is phenomenal.
LikeLike
Thanks! That’s also a perfect use case for this project. And the pHAT DAC does have a pretty solid sound quality.
LikeLike
I have been loving this. I use it daily and was getting ready to order a 2nd Phat Dac.
It just recently quit showing up in bluetooth. I thought maybe a corrupted microSD card. So I pulled the card and it reads fine. I bought 2 new cards and installed the image on them. It started working for another day. With the both the original card not having been re-imaged and the two new cards. Then quit again. I have tried 4 different Pi Zero W’s. 2 new out of the package. 2 cables and 3 cards.
I would assume that it will show up in bluetooth even if the Phat Dac is not connected?
I can still connect to other bluetooth devices on my phone.
LikeLike
I have been loving this project and using it daily in my vehicles. I will be putting a second and probably 3rd together so I don’t have to move it around.
It is a godsend for my Fusion with no bluetooth and better than the factory bluetooth in my Jeep.
I had a small hiccup this last week which had me swapping Rpi’s microSD cards and power cables. Turns out it was my phone. While it would still connect to other bluetooth devices, the pi would not show up in the list of devices at all. Finally got it back after turning airplane mode on and then off. A reboot may have also helped.
I have a note 10+. Hope this might help other people if they have a similar problem.
LikeLike
Great to hear you found a solution to the issue. Though, it is bit weird that other BT devices worked but not the Pi.
And thanks for the comments. It’s always nice to hear that a project is used by others!
LikeLike
Thank you so much for posting this! Using your Yocto image it took me maybe an hour to download it, flash the image to an SD card, solder the pHAT DAC to the Zero, and stream some tunes! This will come in handy in my bluetooth-less 2010 Honda Civic. Thanks again!
LikeLiked by 1 person
PHat is discontinued… do you know if the new pirate audio dac would work?
https://shop.pimoroni.com/products/pirate-audio-line-out
LikeLike
I don’t happen to know if the pirate audio DAC would work, but if you are looking for a really simple device that does not also require the Zero, I use a VHM-314 Audio Receiver board with Bluetooth 5.0 mp3 lossless decoding. I also built the unit described by this blog and love it, but I wanted something that would use less power for battery applications. The VHM-314 is not “customizable” as this Zero-based unit is, hence, you have to consider your application. I also believe that at some point I could add some bells-and-whistles to the Zero-based project, but have not gotten around to such yet. Best wishes!
LikeLike
So very thank you. Looking for this device you advice me.
Regards
LikeLike
Well, my “bells-and-whistles” project to re-purpose the Pi-Zero-W with pHAT DAC turned out to be NO effort other than to program an SDcard with Voumio (volumio.org) and load that! I now have a wireless audio streaming device that is addressable on my network and accessible by NICE GUI via any browser! (I had made it battery-powered previously, hence, I can use it with batteries OR AC-to-CD adapter.) Way too cool! I didn’t have to do ANYTHING to the hardware (which I can revert back to the bluetooth image, here, if I want to by just loading a different SD card)!
LikeLike
I believe any standard I2S DAC would work.
LikeLike
This is great—thanks for making it available.
I installed the latest image (with AAC support) but the audio was continually cutting out after 10-15 seconds. The bluetooth remained connected. I rolled back to the previous image which works fine but I thought you might want to know about the issue I was having.
I read in the comments above that you can change the name of the device by amending a conf file but I can’t figure out how to access it. IS there any way for me to connect to the pi when its using the pre-built image, or can I only do that if i run through the Yocto set up process myself? I’ll give that a try tomorrow, anyway.
LikeLiked by 1 person
Ok, nevermind! It’s late and i completely wasn’t thinking about the serial pins.
LikeLike
Thanks for the comments! Yes, the serial port is an easy way to access it, or alternatively I think you can simply edit the files on the card after flashing on your PC.
If you do hook up the serial interface, maybe you could see if there are some obvious error messages in dmesg or system log when the audio cuts out.
LikeLike
Great work Sami!
I’m trying to convert it to systemd (just for the sake of learning:-) ), but I’m struggling to get it to work. Do you know if anyone has successfully converted it to systemd?
Thanks again for your effort, Sami.
Cheers,
Ruben
LikeLike
Magnificent work. My pi zero with i2s audio bonnet works flawlessly paired with a cheap amp box and bookshelf speakers. Do you recommend a shutdown routine? Maybe a terminal command? Not a biggie, I just want to move it around without corrupting the boot disc. Thanks again for your work!
LikeLike
The device uses read-only rootfs (except /var/lib to allow writing the pairing information) so corrupting the boot disc is pretty unlikely. Personally I have not used any shutdown routine.
LikeLike